Once your power cord is firmly plugged in, then switch them on. Not everything you plug in will draw the same amount of electricity. Some devices run quite well on very little power, while others are big draws on your available power. Most of your kitchen appliances use a lot of electricity. Your microwave , coffee maker, and toaster are all electricity hogs. Air conditioning units also pull a lot of power, as does running a slide out.
Also, bathroom devices like hair dryers and curling irons use a lot of electricity. Items like your TV and stereo, though, use considerably less power. Regular maintenance and inspection is the easiest way to spot a small problem before it becomes a big issue. On a frequent basis take a look at your batteries and all of their connections. A good time might be just before you depart on a trip.
Check to make sure that all of the connection points are secure, nothing looks damaged or frayed, and everything is clean with no signs of corrosion. Additionally, know where the RV electrical panels are in your motorhome. In that case, you can use a small test light that will illuminate if a fuse is good. Get your vehicle serviced only by individuals who are knowledgeable and experienced in RV electrical repair. It could save your RV, it could save your budget, and in serious situations, it could save your life. Skip to content How much can you make renting your RV?
JavaScript is required for this content. Begin by pushing enough wire down to the panel, with about 3' extra, to get it inside. Do not open the panel yet or put the wire inside it. Run the wire to the new outlet location, pulling it out and free of the wall. Make sure to fasten it every 4', but do not install it on the surface of any wall within arm's reach where it can be touched or damaged. Not even a ceiling. If you have a metal box, install the cable clamp.
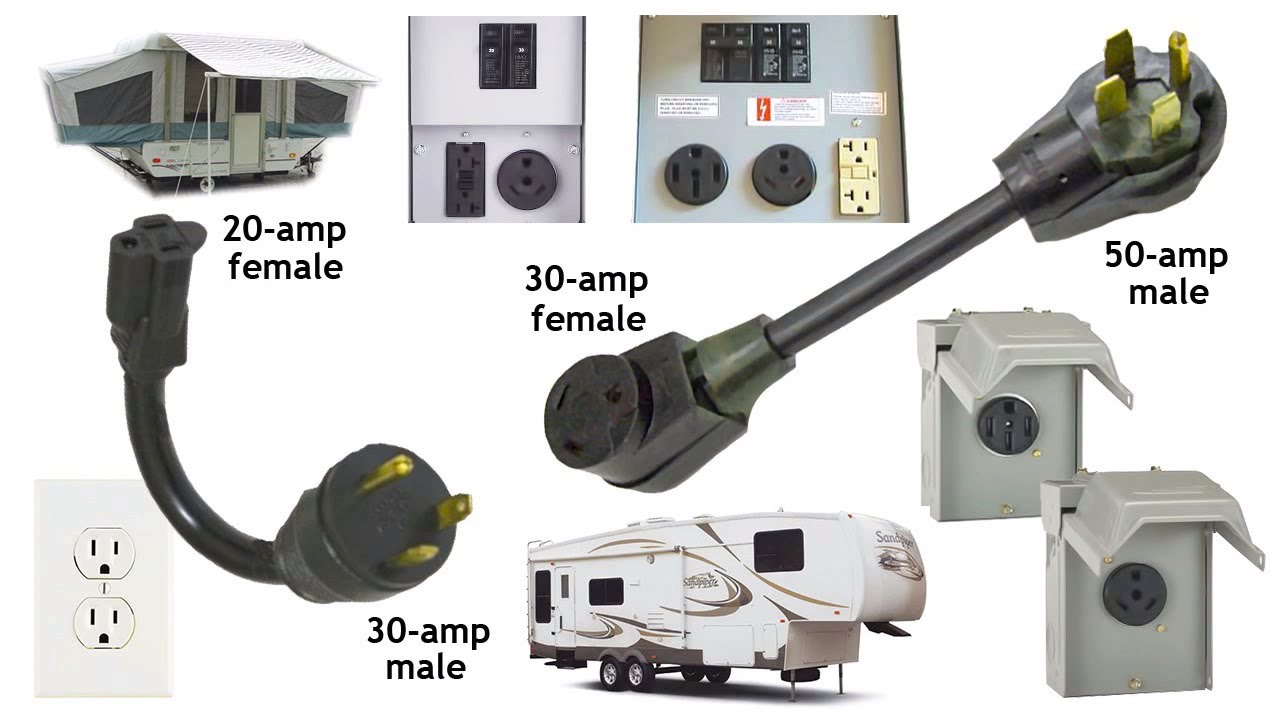
Insert the wire into the box and tighten the cable clamp as necessary. Install the box into or onto the wall, making sure the wire is not kinked as you do so. Replace any sheetrock that was removed to mount the box. Wire the new outlet. Outlets that are 30 and 50 amp have labels on the back indicating which wire goes where - see the photos below of those outlets. The 50 amp outlet shows "white", "X", "Y" and "green" in this case - the "X" and "Y" terminals refer to the two, black and red, hot wires and it doesn't make any difference which goes where.
Make absolutely sure the white and ground green or without insulation go where they are supposed to. A hint for 30 and 50 amp outlets; most RV plugs are designed so that the prongs are at right angles to the core, unlike an extension cord, and with the ground prong at the top, not the bottom, when it is plugged in. Take a look at the cord on your RV and turn the outlet so that the cord will hang down, not up, when plugged in.
Install the wired outlet into the box. Install any covers, as required.
About the Expert
Remember that a requirement for any outdoor outlet is that it has a cover that can be closed with the cord plugged in, and that it will have to match the size of your box. Amazon carries such covers , as do home improvement stores although such stores often do not carry the metal covers, just plastic ones , in both single and double gang styles. Make sure you buy one that hinges at the top, not on the side. Now comes the only tricky part of the entire project - entering the panel box.
- Need to Know Differences Between 30 and 50 Amps;
- Other Materials Needed.
- RV Electrical: All the Basics You Need To Know!;
- first date after hookup.
- One RV, Two Electrical Systems.
- Which Outlet do I Need?.
Turn off the power! I can't emphasize this enough. If you have a main breaker in the panel, a large breaker mounted differently than the others and stamped " amps" or more, turn it off. If your panel does not have a main breaker, it means that a different panel has a breaker that feeds the one you are working in. Turn that breaker off, and tape it off, or in some way ensure it won't be turned on by someone else while you are working.
Even with a main breaker turned off, there is still live electricity in the panel at that main breaker, though, so take extreme caution. If you touch those terminals you will receive a very nasty shock, and if you touch them with a screwdriver or other tool you will fill the air with droplets of molten metal. As an electrician I will do my best to work in panels that even might be hot with one hand in my pocket and only one hand in the panel. Remove the panel cover and, if possible, check with a voltmeter or a non-contact voltage tester that the power is dead everywhere except the main breaker.
- First, a Simple Lesson on Electricity.
- online dating markham.
- bagel dating service.
These non-contact voltage testers are handy safety equipment and are inexpensive. There is always one in my pocket when on the job and I highly recommend them for anyone working around electricity. Breakers in nearly all home panels are held in place by "hooking" the outside edge, the edge closest to the side of the panel, and pushing them firmly down in the center. See the photos below that show removing and re-installing one.
Locate the empty space you will put the new breaker in, make sure it is turned off, and install it into the panel box. It may take considerable force to get the breaker fully pressed down, but hammers or other tools are not necessary. If it won't go down with your fingers it hasn't been hooked just right. Bring the new wire through a cable clamp and into the panel. Tighten the screws on the cable clamp.
RV Parks Cracking Down on 50 Amp Rigs Using 30 Amp Sites | RV Miles
Strip off all the outer sheath of insulation inside the panel, being careful not to scar the insulation on the wire itself. This is probably going to bring your fingers and tools near to that main breaker - the one that still has power to it. Never forget where your fingers are, or just where that knife you used to strip the cable sheath is. Neatly route the ground wire to the ground bus, following the path of existing wires, to where all the other grounds are terminated, loosen a screw as necessary and terminate the ground wire.
Again, that bare ground wire is likely going to come close to the hot main breaker. The last wire to be terminated is the hot wire s , on the breaker itself.
RV Information from Kampgrounds of America, Inc.
It doesn't matter which color goes to which screw on the breaker. Make sure the termination screws do not contact the wire insulation but don't leave a lot of bare wire sticking out, either. Tug on each wire to see if you can pull it out - you should not be able to. Remove any blank spaces in the cover as necessary by grasping it with pliers and bending it back and forth until it breaks.

Re-install the panel cover and any wall covering that was removed to facilitate getting the wire into the panel. Label your new breaker on the panel schedule that states which breaker is for what. Content is for informational or entertainment purposes only and does not substitute for personal counsel or professional advice in business, financial, legal, or technical matters.
Top Tips From This Video
What size wire and conduit do I need for a 50 amp outlet? How does installing an RV outlet at home work with the RV cable pointing straight up? It is probably wise to mount the outlet with the ground up, rather than down.
- dating non romantic guy.
- .
- dating site fee comparison.
Most, if not all, modern RV cords are designed that way. Older ones may not, however, so do check your cord before installing the outlet into the box. Sign in or sign up and post using a HubPages Network account.